This blog post has been written in collaboration with Mohit Gupta whose blog covers cybersecurity and other random technical things.
For our home labs, we have a number of internal systems shared between the two of us including a number of web services. Originally, these were accessed over plaintext HTTP connections, or bypassing any certificate trust errors for HTTPS connections when connecting. However, we wanted to create a more secure setup. The problem was finding a way to do that without the shared CA infrastructure opening security holes elsewhere.
Certificate Authorities
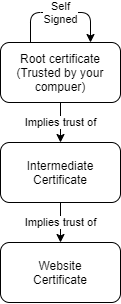
A Certificate Authority (CA) is an entity that issues digital certificates, commonly used to prove ownership of the subject(s) stated within the certificate. When someone visits a website over an encrypted channel, part of the process of validating that you are talking to the correct site is through a certificate issued to the website. The certificate is signed by a certificate or a chain of certificates. In order for a client to trust a website, one or more certificates within the chain is marked as trusted within the client device. A number of CAs are preloaded into systems, and the majority of sites visited have a certificate issued by one of these CAs allowing clients, such as browsers, to validate they are communicating with the correct website.
While we could have created a standard CA on a shared system and used that to sign certificates for internal systems, this could also be used to sign certificates for any other website, e.g. banks, adding scope for malicious use. The downsides of this approach outweighed any benefit of being able to use HTTPS internally.
After some research, Mohit discovered the Name Constraints x509 extension which could be applied to a CA. This extension limits the scope of certificates that could be issued by this CA to only those that are within the constraints of the extension. For example, if we set the extension to “.example.com”, a certificate issued for “google.com” by that CA would not be trusted.
Although support for this extension isn’t guaranteed to be universal due to the general nature of x509 extensions, it is possible to limit the trust of the CA and its signed certificates to just systems that support the extension by using the critical flag. This flag informs systems that do not recognise the extension to not accept the certificate as opposed to the default behaviour of ignoring the extension. However, during testing it did appear the extension was supported by major OSes, web browsers and CLI tooling. If you have concerns for certain systems within your environment, feel free to test yourselves.
Our Environment
Once we had identified the method for solving the problem, the next issue was identifying the scope for which we would permit the CA to operate under. At the time, our home network utilised the “local” TLD, however when doing some research on this TLD, Tyler identified that it is reserved for multicast DNS. As such, we decided this would be a good time to migrate away from “local” and after perusing some RFCs, identified a list of TLDs which could be used with minimal perceived issues in future. Out of this list, we picked “lan”.
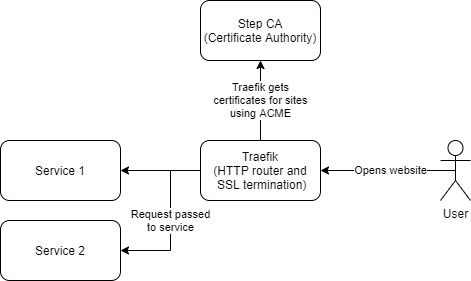
After generating a CA constrained to “.lan”, we utilised the Step CA server to provide an ACME endpoint within the local network which local systems could interact with to obtain and renew certificates for services they host.
Of course we didn’t document the steps needed to implement this, and as such we plodded on happily enough until about a year and a half later, when I needed to implement the same solution again somewhere else. Whilst we couldn’t remember the exact steps required, Mohit remembered enough of the high level concepts and stages needed to give me a headstart. With this information, the CA files we had, and some experimentation, I re-created the steps needed and we decided it was probably worth documenting this.
Step-by-Step Guide
The following sections describe how to create a CA and to deploy it using a combination of Step CA and Traefik to provide HTTPS capabilities for containers on the local network. The sections can also be used on their own if you only want to recreate part of the setup
Example configuration files and scripts to perform the steps detailed below can be found on GitHub
Part 1 CA certificate
The first step is to create the CA root certificate with the x509 constraint. To do this, start with creating a configuration file (ca.conf) with contents along the line of what is shown below. Update the domain in the `nameConstraints` option to the desired domain for the CA. For the remainder of this post, we will be using `.lan`.
# dont prompt for distinguished name values and use the values as is
prompt = no

[req]
distinguished_name = req_dn
req_extensions = v3_req
x509_extensions = v3_req

# distinguished name fields and values
[req_dn]
# common name to add to CA, this can be changed to another name if you wish
CN = rootCA

[v3_req]
# sets the generated key to be a certificate authority
basicConstraints=critical,CA:true
# sets the permitted uses of the key to sign certificates and revocation lists
keyUsage=critical, keyCertSign, cRLSign
# restricts the key to only be valid on the given domain
# replace this with the domain you want the certificate to be valid for e.g. “.lan” note: the preceding dot is required
nameConstraints=critical,permitted;DNS:.lan
# Sets the key identifier based on RFC 5280 which is required for some clients
subjectKeyIdentifier  = hash
After creating the configuration OpenSSL is then used to generate a key and a self signed certificate:
# Create a new private key
openssl genrsa -out rootCA.key 4096

# Generate a new certificate signed by the previously generated private key with the earlier config file
openssl req -x509 -new -nodes -key rootCA.key -sha512 -days 3650 -out rootCA.crt -config ca.conf
You can check your created certificate by running the following command. If done correctly the x509v3 extensions section should look like the example.
openssl x509 -text -in rootCA.crt -noout
        X509v3 extensions:
            X509v3 Basic Constraints: critical
                CA:TRUE
            X509v3 Key Usage:
                Certificate Sign, CRL Sign
            X509v3 Name Constraints: critical
                Permitted:
                  DNS:.lan
Part 2 ACME server
While you can use the root certificate directly, it is much easier to use it though software such as an ACME server which is useful for automating the issuance of certificates. In this guide we will be utilising step-ca within Docker. The following instructions will also work with some minor modification for use without Docker. There are also alternative methods outlined within the step-ca documentation.
Start off by creating a directory to store your step-ca configuration and certificate material, copying your previously generated CA root key and certificate into that directory.
Next, initialize your step-ca by running the following command
# Spawn a container to run step commands within
docker run -it --rm -v `pwd`/data:/home/step smallstep/step-ca bash
# Initialise step-ca with our CA certificate and key in standalone mode
step ca init --root=rootCA.crt --key=rootCA.key  --deployment-type=standalone
You will be asked several questions when running the command which are explained below.
What would you like to name your new PKI?
✔ (e.g. Smallstep):
This can be any name you choose to give to your CA e.g. “Homelab” or similar, This will be used as the name of the intermediate CA used by step-ca.
What DNS names or IP addresses would you like to add to your new CA?
✔ (e.g. ca.smallstep.com[,1.1.1.1,etc.]):
This will want to be the address your CA will be accessible on, this could be its hostname or IP address.
What IP and port will your new CA bind to?
✔ (e.g. :443 or 127.0.0.1:4343):
This will be the port your CA will be accessible on. If using docker this can be set to anything and remapped, the other steps in the guide will assume `:8443`. Note: the preceding colon is required.
What would you like to name the CA's first provisioner?
✔ (e.g. you@smallstep.com):
This can be set to anything. I set mine to `provisioner`
Choose a password for your CA keys and first provisioner.
✔ [leave empty and we'll generate one]:
This can be left blank or you can set your own. If you leave it blank, a random password is generated for you.
With the step-ca configuration created, the CA password needs to be stored in `secrets/password`and permissions set appropriately. This can be done with the following commands.
echo "<your password here>" > secrets/password
chmod 600 secrets/password
You will also need to add an acme provisioner to the stepca config
step ca provisioner add acme --type ACME
The last step is to create a docker-compose.yml file that will run the ACME server. This can then be started by running `docker-compose up -d`.
version: "3"

services:
    step:
        image: smallstep/step-ca
        restart: always
        ports:
            - 8443:8443
        volumes:
            - ./data:/home/step
Once the container has been deployed, you can check to ensure it is correctly operational by querying its health check endpoint.
wget --no-check-certificate --quiet -O- https://localhost:8443/health
This should return `{“status”:”ok”}` if things are working ok
Part 3 Traefik
With a working ACME server, it can now be integrated with other technologies which have the ability to utilise the ACME protocol to request certificates. One such example is Traefik, a HTTP reverse proxy.
In order to use your CA within Traefik you will need to add the ACME server as a resolver to your Traefik config:
[certificatesResolvers.internal.acme]
    email = "certificates@email.lan”
    caServer = "https://acme.lan:8443/acme/acme/directory"
    storage = "/acme.json"

    [certificatesResolvers.internal.acme.httpChallenge]
        entryPoint = "http"
This will configure Traefik to request certificates from `https://acme.lan:8443`, where our ACME server is running. These certificates would be requested with the `HTTP-01` challenge type. This is where the ACME server provides Traefik a token to make accessible over HTTP and validates the domains, which are requested for the certificate, by performing HTTP requests with those domain names and checking for the pre-supplied tokens.
Traefik also needs to be configured to trust your newly generated root CA, this can be done by adding the following environment variable to your container configuration and adding the root certificate into the container e.g. through a volume.
        environment:
            - LEGO_CA_CERTIFICATES=/rootCA.crt
The final step is to tell Traefik to use the internal certresolver for a particular container e.g. by adding the following entries to your container labels.
traefik.http.routers.<name>.rule: "Host(`<hostname>.lan`)"
traefik.http.routers.<name>.tls.certresolver: "internal"
Part 4 installing the CA onto your systems.
Step-by-step guides for installing a CA are out of scope for this blog due to the wide variety of methods required for different systems, below are a few links for some common systems. If the below aren’t applicable to you, google is a good friend
Updates
2026-05-30: Upate ca configuration to include subjectKeyIdentifier